Creating a 3D animation video from text using AI is an exciting journey, blending creativity with cutting-edge technology. If you’re intrigued by the idea of bringing stories to life with just a few clicks, let’s dive into the process, step by step. Remember, the beauty of AI in creative endeavors is that it opens up a world of possibilities, even for those with limited technical skills in traditional animation or video production.
Part 1: Generate Your Desired Image Using AI
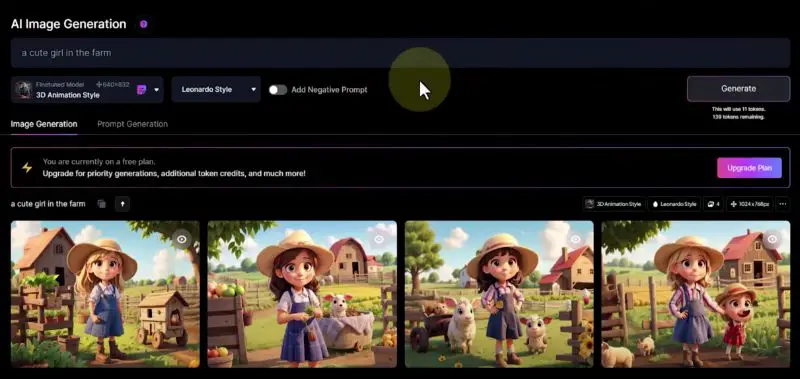
First, we’ll need to create our characters and scenes. This is where Leonardo AI comes into play. It’s an AI platform that transforms textual prompts into images. Here’s how to start:
- Sign Up: Register on Leonardo.ai. Once in, you’ll be greeted with a professional panel.
- Choose Your Model: Select the 3D animation style model from a range of trained models or your own customized models.
- Enter Your Prompt: In the text box, type in your prompt. This could be anything from “a cute girl in 3D animation style” to “a cartoon cow.”
- Generate and Review: Hit the generate button. Review the images and download the ones you like.
You can generate multiple images for different characters or scenes. The best part? On the free plan, you get a generous daily credit allowance.
>> Sign up for FREE on Leonardo.ai today using 👉our affiliate link.
Part 2: Converting Images to Videos with RunwayML
Exploring RunwayML’s Gen 2 Feature
RunwayML offers an intriguing feature known as Gen 2, which serves as a bridge between still images and dynamic videos. This tool is particularly adept at transforming your AI-generated images into short, 4-second video clips. It’s like breathing life into a still frame, creating motion and narrative from a single image.
Uploading Images and Generating Videos
- Accessing Gen 2: Once you’re on RunwayML and logged into your account, locate the Gen 2 feature. This is your gateway to turning static images into moving stories.
- Image Upload: Start by uploading the image you’ve created with Leonardo.ai. It could be anything from a character to a scenic landscape. The uploading process is straightforward – just click, select your image, and you’re good to go.
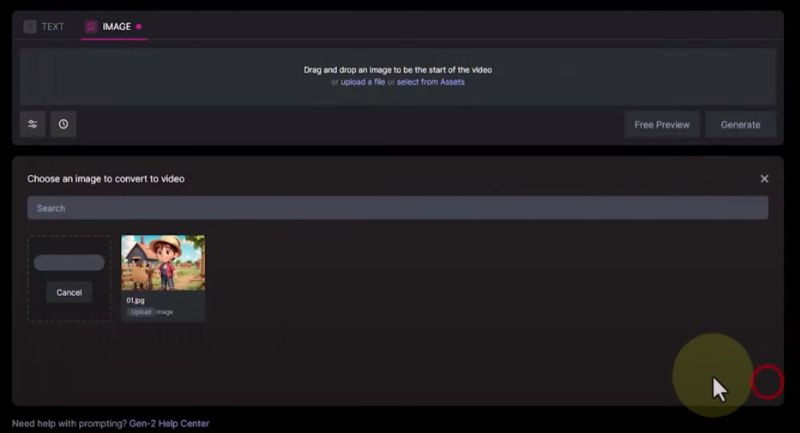
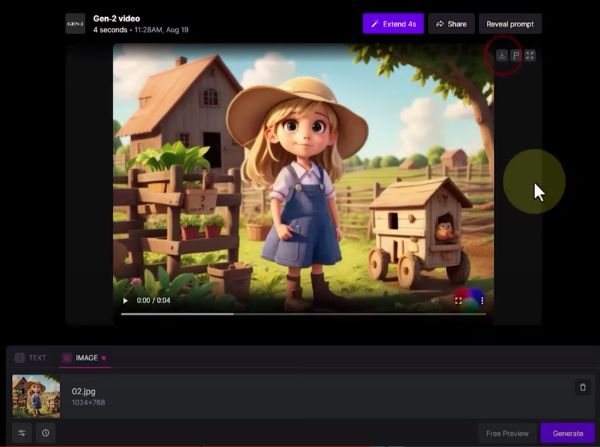
- Video Generation: After your image is uploaded, hit the ‘generate’ button. RunwayML will now work its magic, processing your image to create a 4-second video. This short duration is just perfect for capturing a moment or a swift scene transition.
- Reviewing Your Video: Once the generation process is complete, it’s time to see your image come to life. Download the video and play it. Observe how the AI interprets your image into motion, paying attention to how the elements in your image move and interact. This is a critical step to ensure that the output aligns with your vision for the scene.
Creating a Sequence of Videos
- Sequence Planning: Think about your story’s progression. What comes next after your first scene? Planning your sequence is key to creating a coherent narrative.
- Generating Multiple Scenes: Repeat the upload and generation process with different images. Each image could represent a different scene or a continuation of the story. Variety in scenes adds depth to your animation.
- Consistency is Key: As you create multiple videos, aim for consistency in style, character design, and color schemes. This ensures that your final animation feels like a unified story, rather than disconnected clips.
- Compile and Connect: Once you have a collection of videos, the next step is to think about how they connect. How does one scene transition to the next? Does the sequence of events make sense in your narrative?
- Creative Freedom: Experiment with various types of scenes. Close-ups, wide shots, or action sequences can all bring different elements to your story. Don’t hesitate to try new ideas – unexpected results can sometimes be the most captivating!
- Reflect and Adjust: After each video, take a moment to review. Does it add to your story the way you intended? Use this as an opportunity to refine your approach for the next scene.
Part 3: Extending Video Length beyond 4 Seconds
Tackling the 4-Second Limit in RunwayML
RunwayML’s Gen 2 feature offers a fantastic way to bring images to life, but it comes with a limitation – the videos are capped at 4 seconds.
While these brief clips are great for capturing a moment, storytelling often demands more extended sequences. This is where a bit of creativity and some video editing skills come into play.
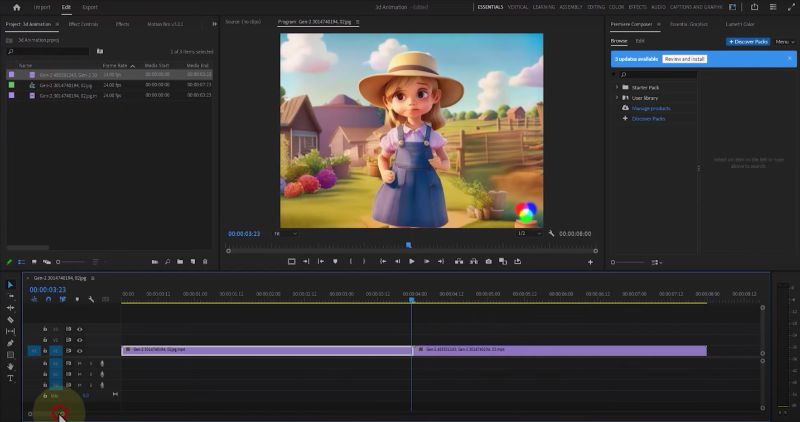
Using Adobe Premiere Pro for Extended Scenes
- Capture the Final Frame: After creating your 4-second video in RunwayML, import it into Adobe Premiere Pro. Here’s where the trick lies: scrub to the video’s last frame and capture a still image of it. This frame will serve as a bridge to your next video.
- Saving the Frame: Once you’ve captured the still image, save it to your computer. This image now represents the last moment of your current scene.
Looping Back to RunwayML
- Uploading the Still Frame: Go back to RunwayML and upload this new still image you saved from Adobe Premiere Pro.
- Creating a Continuation: Generate a new 4-second video using this still image. This new clip will start from where the last one ended, effectively extending your original video.
- Seamless Transitions: The transition between the original video and its continuation should be seamless since the new clip starts right from the last frame of the previous one.
Repeating for Longer Sequences
- Iterative Process: To create a longer video, simply repeat this process. Capture the last frame of each new video, save it, and upload it back to RunwayML to generate the next part of your sequence.
- Consistent Story Flow: Ensure each new video logically follows from the previous one. This consistency is crucial for maintaining a fluid narrative throughout your extended animation.
- Creative Experimentation: Each new segment is an opportunity to slightly alter or evolve your story. Small changes can lead to a dynamic and engaging narrative as the animation progresses.
- Building Your Extended Animation: As you continue this process, you’ll gradually build a more extended animation. Each 4-second segment adds to the story, creating a longer, more comprehensive narrative.
- Review and Refine: After each iteration, review the entire sequence to ensure it flows well. It’s essential to keep an eye on the overall progression of your animation and make adjustments if needed. This could involve tweaking the scenes for better continuity or even reordering clips for improved storytelling.
- The Final Product: Eventually, you’ll have a series of seamlessly connected videos that go well beyond the initial 4-second limitation. This extended animation is a testament to your creativity and the innovative use of AI and video editing tools.
By leveraging the capabilities of both RunwayML and Adobe Premiere Pro, you can break free from the constraints of short video clips.
This method opens up new possibilities for storytelling, allowing you to craft longer, more engaging animations from AI-generated content.
>> Sign up for FREE on Leonardo.ai today using 👉our affiliate link.
Bringing It All Together
By now, you should have a series of seamlessly connected videos, forming a longer animation. The beauty of this process is that it’s incredibly accessible. You don’t need to be a skilled animator or video editor. The AI does the heavy lifting, and you’re the director, telling it what to create.
Tips for Success
- Experiment with Prompts: The more specific your prompts in Leonardo.ai, the better the output. Think of details like emotions, setting, and actions.
- Quality of Images: Higher resolution images from Leonardo.ai can lead to better-quality videos in RunwayML.
- Creative Storytelling: Use a variety of scenes and characters to make your animation more engaging.
- Editing Skills: A basic understanding of Adobe Premiere Pro will help, but even beginners can follow the process to extend video length.
Why Not Give It a Try?
AI has revolutionized content creation, making it accessible and fun. Whether you’re a budding animator, a storyteller, or just curious about AI’s potential in creative fields, this process is a fantastic way to explore and create.
So, why not jump in and start your own AI-powered animation project? Play around with different prompts, experiment with images and videos, and see what amazing stories you can bring to life. And when you do, don’t forget to share your creations and experiences in the comments. Your journey could inspire many others to start their own AI animation adventures!
>> Sign up for FREE on Leonardo.ai today using 👉our affiliate link.