Welcome, tech enthusiasts and AI aficionados! We’re about to embark on a thrilling journey into the world of deepfakes, revolutionized by an innovative AI tool – SwapFace. This groundbreaking technology has made creating high-quality deepfakes not only possible but also surprisingly simple.
By the end of this tutorial, you’ll be swapping faces like a pro. Perfect for those who’ve ever dreamt of casting their favorite celebrity in a home movie!
A Step-by-Step Guide: How to Use SwapFace
How to Download SwapFace on Windows?
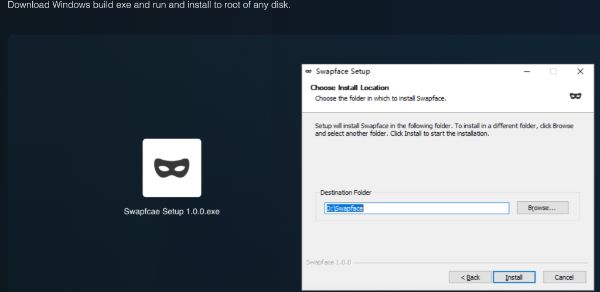
Let’s head over to swapface.org. Grab that URL, pop open your browser, and let’s get going. Once you’re on the site, click on “Download for Windows.”
A heads-up: this file is over 2GB, so depending on your internet speed, it might be time to grab a coffee while you wait. Luckily, I’ve pre-downloaded it to save us some time.

Installation and Account Setup
Once downloaded, click open, then next, and hit install. After installation, it’s time to create an account. For privacy, remember to keep your details safe.
Fill in your email, create a password, and get that verification code from your email. Enter the code, agree to the terms and conditions, and you’re in!

Getting Comfortable with the Dashboard
Once you’re logged into Swapface, you’ll be greeted with a user-friendly dashboard brimming with possibilities. Here, you’ll find three intriguing options: stream face web, video face web, and image face web. Each of these options unlocks a different kind of face-swapping adventure.
Since our mission today is to create a rib-tickling video deepfake, we’ll focus on the video face swap feature.
Exploring the Video Face Swap
In the video face swap section, you’re in for a treat. Swapface offers a variety of pre-loaded videos, ranging from famous movie scenes to generic clips. These are great for quick experiments. But why settle for the ordinary when you can make it personal?
That’s why I’m opting to upload my own clip – a scene from the epic ‘Man of Steel.’ This option adds a unique flavor to your deepfake, allowing you to personalize it with familiar settings or characters.
Uploading Your Own Video
Uploading your video is a breeze. Just click on the upload button, browse through your files, and select that perfect clip you’ve been itching to transform.
Whether it’s a snippet from your favorite movie, a clip from a family video, or just a funny scene you filmed with friends, Swapface can handle it all. Once uploaded, the software will process it briefly, getting it ready for the magic to happen.
Selecting the Perfect Face to Swap
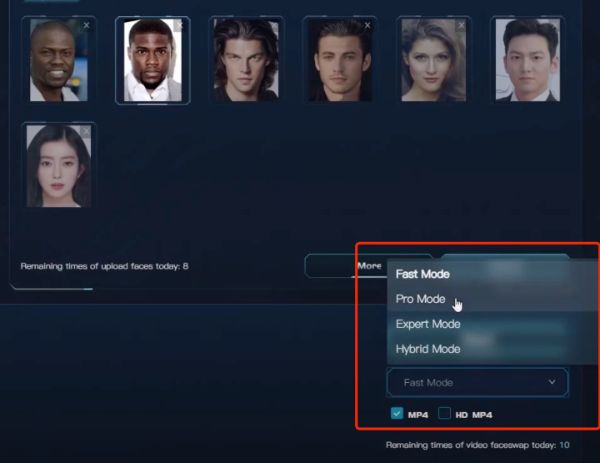
Now, the fun begins! We’re picking a character and for a bit of laughter, I’m choosing Kevin Hart’s face. Picture his comedic expressions in an action-packed scene – the contrast is sure to be hilarious.
Uploading your chosen photo is simple. Just hit the upload button, select your funniest or most interesting face, and let Swapface’s AI do the rest. It’s fascinating to see how different expressions can completely transform a scene.

Choosing the Right Mode for Your Deepfake
Once your chosen photo is snugly uploaded in Swapface, you’re at a pivotal moment – picking the perfect mode for your deepfake. Now, Swapface isn’t just a one-trick pony; it offers a variety of modes, each suited for different needs and technical setups.
For the tech gurus who have a powerful GPU lounging in their systems, going for modes like Pro, Expert, or Hybrid can unleash the full potential of Swapface, providing crisp, highly detailed deepfakes. These modes are designed to leverage advanced hardware, giving you a sleeker, more refined end product.
But what if you’re not decked out with the latest in GPU technology? Fear not! Swapface’s Fast mode is your go-to option. It’s specifically tailored for those who don’t have access to high-end hardware but still want to dive into the fascinating world of deepfakes.
By choosing Fast mode, you’re opting for efficiency and speed. It’s perfect for quick projects and a bit of fun experimentation. Just select Fast mode, opt for the HD MP4 format to ensure good video quality, and hit that Start button.

Revealing Your Masterpiece
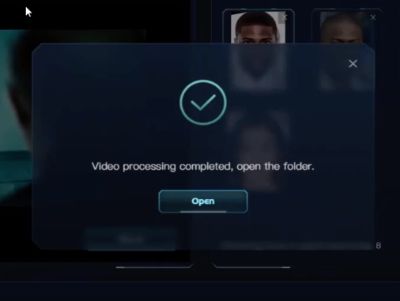
The anticipation builds as Swapface processes your video. But not for long! In no time, you’re ready to behold the magic you’ve created. Once the processing is complete, hit open, and there it is – your very own deepfake masterpiece!
This is where you see your creative vision come to life, where the face you chose blends seamlessly into the video, creating a whole new narrative.
Now, it’s showtime! Play your creation using VLC or any media player of your choice. Watch as the familiar scene takes on a new persona with the face you’ve chosen. It’s a moment of awe, laughter, and maybe a bit of surrealism.
The beauty of deepfakes created with Swapface lies in their ability to morph reality, to mix and match faces and scenes in ways that are only limited by your imagination.

👉Check Swapface Review to Know More!
How to Download and Install SwapFace on Mac?
SwapFace was primarily available for Windows, and there wasn’t a direct version for macOS. However, Mac users have a few alternatives to run Windows applications:
- Using a Virtual Machine: Programs like Parallels Desktop or VMware Fusion allow you to run Windows on your Mac. You can install SwapFace within the Windows environment on your virtual machine.
- Boot Camp: If your Mac has an Intel processor, you can use Boot Camp to install Windows alongside macOS. This way, you can boot into Windows when you start your Mac and use SwapFace there.
- Cross-Compatibility Software: Tools like Wine or CrossOver can sometimes run Windows applications on macOS without needing a full Windows installation. However, compatibility and performance can vary.
Quick Guide to Making a Deepfake with Swapface
| Step | Action | Description |
|---|---|---|
| 1 | Download & Install | Grab Swapface from their website and install it on your computer. |
| 2 | Account Creation | Set up your account with an email and password. |
| 3 | Video Selection | Choose a video from the library or upload your own. |
| 4 | Face Upload | Select and upload the face you want to swap into your video. |
| 5 | Choose Mode | Pick the best mode for your needs; Fast mode works well for most. |
| 6 | Export & Enjoy | Process the video, export it, and enjoy your hilarious creation. |
FAQs
Is it possible to swap faces of multiple people in a single video using SwapFace?
Yes, SwapFace allows for the swapping of multiple faces in a single video. You can upload different photos and apply them to various characters in your video, making it versatile for complex face swap projects.
What are the system requirements for running SwapFace smoothly?
SwapFace generally requires a modern computer with a good processor (Intel i5 or better), at least 8GB of RAM, and a dedicated GPU for optimal performance, especially for higher resolution videos and advanced modes like Pro or Expert.
What types of videos and images work best with SwapFace for face swapping?
For best results with SwapFace, use clear, well-lit, and high-resolution videos and images. The face in the image should be front-facing and not obscured for more accurate face swaps. The software performs better with videos that have consistent lighting and minimal rapid movements.
Final Words
Creating a deepfake video is a breeze with Swapface, and the results are hilariously impressive. Whether you’re pranking friends or just exploring the capabilities of AI, Swapface is a fantastic tool to start with. So go ahead, give it a try, and have some fun!
