Let’s talk about something that’s about to shake up the Photoshop universe – Draggan AI. This isn’t just another editing tool; it’s like the wizard of Oz behind the curtain of image manipulation. Ready to dive into a world where a few clicks can redefine an image? Buckle up!
What is Draggan AI?
Imagine you’re chilling with your laptop, and you’ve got this photo. It’s good, but you think, “Hey, what if I could just twist this smile a bit or make the cat look at the camera?” That’s where Draggan AI waltzes in. With Draggan AI photo editor, all you do is click on a couple of points on the face or whatever you want to tweak, and voilà – the magic happens. This isn’t just next-level; it’s like jumping to the final level without the boss fight!
Key Features and Benefits
- Adaptive Learning: Draggan AI adapts to new data inputs, continuously evolving its analytical capabilities.
- Versatility: It’s applicable in diverse fields like healthcare, finance, and customer service.
- User-Friendly Interface: Designed for both tech-savvy and novice users.
How to Get the Party Started?
First things first, you’ll need to decide where you want to play around with this tool. You’ve got two hot tickets to this show: the Google Colab demo or getting down and dirty with a local deployment (if you’ve got the GPU muscle).
The Google Colab Rodeo
If you’re opting for Google Colab, it’s pretty straightforward. Save the file to your drive or GitHub (if you’re feeling fancy), and make sure you’re running Python 3 with a GPU accelerator. Then, it’s just a matter of running a couple of code blocks to get everything set up. Easy peasy.
Local Deployment: For the Tech-Savvy Folks
For those who prefer the local route, it’s a bit more hands-on. You’ll be setting up a Python environment, installing some packages, and running the Draggan web app. If you’re a Mac user, even better – it supports those shiny M1 and M2 MacBooks too!
Playing with Draggan AI: The Fun Part
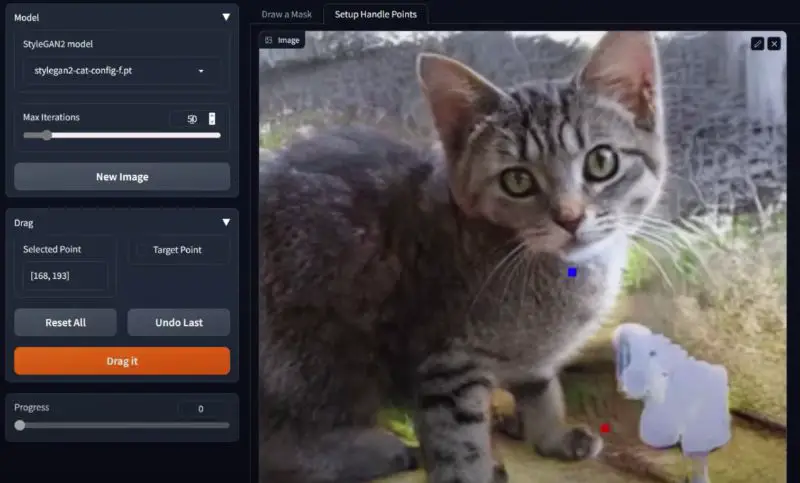
Now, let’s get to the good stuff. Once you’ve got Draggan AI up and running, it’s playtime. You can upload your images (though it might take a minute to load), choose from various models like human faces, cats, churches, horses, and start experimenting.
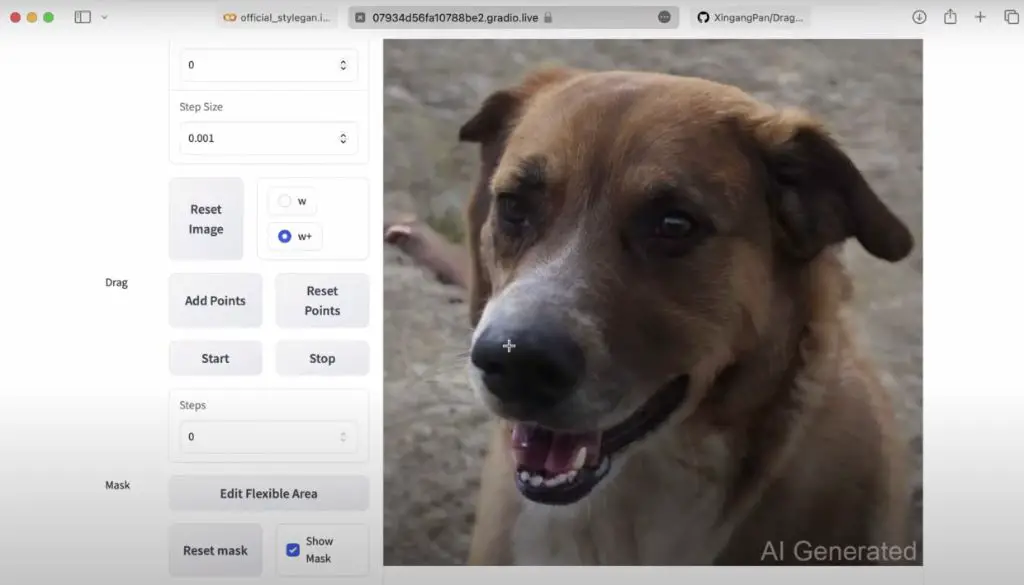
The fun begins when you select points on your image (blue for starting point, red for where you want it to go), and watch as Draggan AI does its thing. Want to see a cat sit differently? Maybe adjust a smirk on a face? Go for it!
The Iteration Game
Here’s where it gets even cooler. You can set the number of iterations for the tool to run, tweaking how much the image changes with each pass. It’s like telling an artist, “A little to the left, no, a bit more…” until it’s just right. But hey, keep in mind, it’s not perfect every time. Sometimes you get a masterpiece, other times… well, let’s just say you wouldn’t want it as your profile pic.
Step-by-Step Guide on How to Use DragGan AI
Step 1: Accessing DragGAN AI
- Locating the Gateway: Begin your journey by identifying a trusted source from which you can download the code. Alternatively, you can learn about the installation process right here for a smooth start.
- System Check: Ensure your device meets the required specifications for smooth operation. A good internet connection and a compatible device are key.
Step 2: Uploading Your Image
- Image Selection: Choose the image you wish to edit or transform. This will be the foundation of your creative exploration.
- Upload Mechanism: Use the “Upload” button on the DragGAN AI platform to import your image. Alternatively, you can drag and drop the image directly into the interface.
Step 3: Exploring the Tools
- Tool Familiarization: Spend some time getting to know the various tools available in DragGAN AI. This could range from color adjustment options to advanced filters.
- Capabilities Understanding: Understanding the functions and limitations of each tool will better equip you to realize your creative vision.
Step 4: Editing or Generating Your Image
- Initiate Editing: Depending on your goal, you can either start modifying your uploaded image using the available tools or explore DragGAN AI’s capabilities to create new content.
- Experimentation: Don’t hesitate to try different combinations of tools and settings. Experimentation can lead to unexpectedly pleasing results.
Step 5: Refining Your Work
- Detailing: After your initial edits or generation, refine your work. Pay attention to the finer details like color balance, contrast, and overall sharpness.
- Iterative Approach: It’s often a process of trial and error, so feel free to make multiple adjustments until you achieve your desired outcome.
Step 6: Saving and Sharing
- Finalization: Once you are satisfied with your creation, save the image. DragGAN AI should offer various formats suitable for different uses.
- Sharing Your Art: Share your finished work with friends, family, or on social media platforms. Your creative journey might inspire others!
Where to Use DragGan AI?
In Business and Marketing
Draggan AI can analyze market trends, predict consumer behavior, and optimize advertising strategies. It’s invaluable for businesses looking to enhance their digital marketing efforts.
Healthcare Applications
In healthcare, Draggan AI assists in diagnosing diseases, analyzing medical images, and personalizing patient treatment plans.
Personal Use
For individual users, Draggan AI can act as a personal assistant, managing schedules, providing recommendations, or even assisting in learning new skills.
Conclusion: A Whole New World of Possibilities
Draggan AI is not just a tool; it’s a playground for your imagination. It’s like being handed a magic wand for your photos and being told, “Go nuts!” So go ahead, give it a whirl, and see what kind of wizardry you can conjure up.
In the grand words of a wise man, “What a time to be alive!” Enjoy the ride, and maybe even show some love by sharing this article with your friends. Leave a comment below to let me know if you found this article helpful!